wagnerbianchi.com

MaxScale HA with Keepalived (CentOS/RedHat 7++)

março 29th, 2019 Bianchi Posted in Data Infrastructure, MariaDB Maxscale No Comments »

This document aims to guide you through the implementation of what we call here as being the MaxScale HA with Keepalived. To introduce the subject and keep it as simple as possible, the keepalived is routing software written in C. Its main goal is to provide simple and robust facilities for load-balancing and provide high availability to environments, having the kernel module operating on layer4 (transport, TCP). Also, to be a faster layer than layer7, keepalived implementing its protocol which is the VRRP, will move the VIP between the configured interfaces so systems can continue accessing the same IP while using another underlying resource.

VRRP specifies an election protocol that dynamically assigns responsibility for a virtual router to one of the VRRP routers on a LAN. The VRRP router controlling the IP address(es) associated with a virtual router is called the Master and forwards packets sent to these IP addresses. The election process provides dynamic failover in the forwarding responsibility should the Master become unavailable. It allows any of the virtual router IP addresses on the LAN to be used as the default first hop router by end-hosts. The advantage gained from using VRRP is a higher availability default path without requiring configuration of dynamic routing or router discovery protocols on every end-host.” [rfc2338]

Before going further:

The solution’s big picture:

Screen Shot 2019-03-29 at 15.30.15

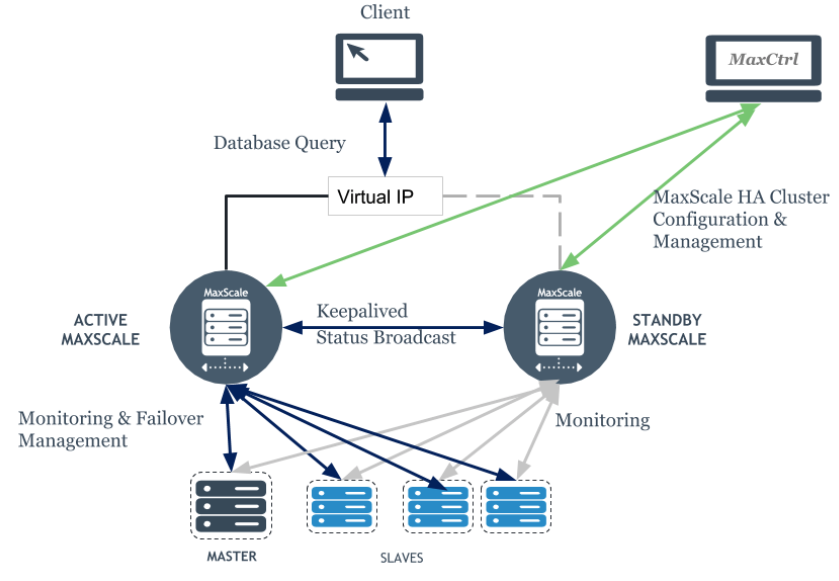
This document assumes you already have a set of MaxScale servers running, and you are going over the keepalived implementation (another document should be linked here to cover the MaxScale setup). Below you will see the backend IPs and the VIP to be configured on keepalived is 10.0.0.100, as you see later. The MaxScale server’s IPs are both 10.0.0.11 (box01) and 10.0.0.12 (box02).

#: My current environment has the below Replication Cluster
[root@box01 ~]# maxctrl list servers
┌────────┬───────────┬──────┬─────────────┬─────────────────┬──────┐
│ Server │ Address   │ Port │ Connections │ State           │ GTID │
├────────┼───────────┼──────┼─────────────┼─────────────────┼──────┤
│ box03  │ 10.0.0.13 │ 3306 │ 0           │ Master, Running │      │
└────────┴───────────┴──────┴─────────────┴─────────────────┴──────┘
│ box04  │ 10.0.0.14 │ 3306 │ 0           │ Slave, Running  │      │
└────────┴───────────┴──────┴─────────────┴─────────────────┴──────┘
│ box05  │ 10.0.0.15 │ 3306 │ 0           │ Slave, Running  │      │
└────────┴───────────┴──────┴─────────────┴─────────────────┴──────┘

Also, we consider the MaxScale version is 2.3++, and you already have dedicated configurations for the REST API port listening on a dedicated IP or over all the IPs. Below you can see what is recommended for the MaxScale global configurations on all the MaxScale instances you are going to work with.

[maxscale]
threads          = auto
log_augmentation = 1
ms_timestamp     = 1
syslog           = 1
admin_host       = 0.0.0.0 #: REST API on all interfaces - add a more restrictive valur if possible
admin_port       = 8989    #: The REST API port - add a more restrictive value if possible

Special attention to SELinux, permissive or disabled is the best status for that. If a customer is using that, they will be able to provide a new target configuration for MaxScale and keepalived. This can be a big problem as keepalived will be using ephemeral ports and executing lots of scripts.

The steps this document goes through are below:

  • Recognize the environment, knowing what hosts are currently dedicated to MaxScale;
  • Packages installation, keepalived, and kernel-headers;
  • Add configuration files for keepalived and the maxping.sh;
  • Add the required user to execute scripts on behalf of keepalived;
  • Configure Keepalived and MaxScale to start on boot;
  • Monitor the syslog to observe the transitions.

Recognize the environment

It’s important to recognize the environment, and list the IPs; you can use the hosts’ file to set up a local DNS in case you don’t have very complicated hostnames, set up the SSH key-based authentication between MaxScale hosts, and make sure you have rsync and maxctrl available to work with. Maxctrl is already part of the package as one of the requirements here is to be running MaxScale 2.3++. The rsync package should be set up in case it’s not, and the rsync port (873) should also be observed from the firewall standpoint. With this, we can move on.

Packages installation on all MaxScale instances

One of the things to observe here is that most of the customer does not have access to the internet configured on the servers and then, a wget is suggested to test it:

[root@box01 ~]# wget --spider http://www.google.com
Spider mode enabled. Check if remote file exists.
--2019-03-06 20:41:42-- http://www.google.com/
Resolving www.google.com (www.google.com)... 172.217.162.164, 2800:3f0:4004:800::2004
Connecting to www.google.com (www.google.com)|172.217.162.164|:80... connected.
HTTP request sent, awaiting response... 200 OK
Length: unspecified [text/html]
Remote file exists and could contain further links,
but recursion is disabled -- not retrieving.

As you can see, the 200 is the HTTP response, so, we have access to the internet and we can set up the below packages:

$ yum install curl gcc openssl-devel libnl3-devel net-snmp-devel kernel-headers kernel-devel mailx keepalived -y

Add configuration files for keepalived and the maxping.sh

You can see below the configuration files for the MASTER and for the BACKUP sides, considering we have 2 MaxScale instances (if three, one MASTER and two BACKUP) and the maxping.sh which is a little script that demands a little customization so we can ask keepalived user to execute that script to check if it can list servers through maxctrl and recognize servers names by their names, so, the script executes with no errors passing the exit 0 messages to keepalived back which keep the current server as MASTER. Keeping the current server as master means that keepalived will keep the VIP on MASTER on the configured interface.

You need to pay attention here to the fact that, one server will operate as MASTER and the other one as BACKUP. Don’t add both as MASTER and with the same priority, that’s why I’m considering two configuration files below.

#: /etc/keepalived/keepalived.conf (for the MASTER MaxScale)
global_defs {
  notification_email {
    customer@domain.com
  }
  notification_email_from box01@maxscaleservers
  smtp_server smtp.domain.com:25
  smtp_connect_timeout 30
}
 
vrrp_script chk_myscript {
  script "/usr/local/mariadb_rdba/maxping.sh"
  interval 2
  fall 2
  rise 2
}
 
vrrp_instance VI_1 {
  state MASTER
  interface eth1
  virtual_router_id 51
  priority 101
  advert_int 1
  smtp_alert
  enable_script_security
    authentication {
      auth_type PASS
      auth_pass C97;*V69
    }
 
    virtual_ipaddress {
      10.0.0.100/24
    }
 
    track_script {
      chk_myscript
    }
notify /usr/local/mariadb_rdba/maxify.sh
}

Attention to the below BACKUP host configuration:

#: /etc/keepalived/keepalived.conf (for the BACKUP MaxScale)
global_defs {
  notification_email {
    customer@domain.com
  }
  notification_email_from box01@maxscaleservers
  smtp_server smtp.domain.com:25
  smtp_connect_timeout 30
}
 
vrrp_script chk_myscript {
  script "/usr/local/mariadb_rdba/maxping.sh"
  interval 2
  fall 2
  rise 2
}
 
vrrp_instance VI_1 {
  state BACKUP
  interface eth1
  virtual_router_id 51
  priority 100
  advert_int 1
  smtp_alert
  enable_script_security
  authentication {
    auth_type PASS
    auth_pass C97;*V69
  }
 
  virtual_ipaddress {
    10.0.0.100/24
  }
 
  track_script {
    chk_myscript
  }
notify /usr/local/mariadb_rdba/maxify.sh
}

Below is a small script executed by the keepalived (which has a user for that) which will be querying the server’s list out of MaxScale using the MaxCtrl client program, through the REST API configured to respond on port 8989, and will return the exit 0. This way, the MASTER role is kept. Otherwise, a new transition starts. Attention to the below script’s comments.

#!/bin/bash
 
#: /usr/local/mariadb_rdba/maxping.sh - don't execute this below script with root user or, 
#: execute and remove the /tmp/maxping.txt before starting the keepalived.service officially
#: avoid the syslog entry "exited with status 3"
 
fileName="/tmp/maxping.txt"
rm $fileName
timeout 2s maxctrl list servers > $fileName
to_result=$?
if [ "$to_result" -ge 1 ]; then
    echo Timed out or error, timeout returned $to_result
    exit 3
else
    echo MaxCtrl success, rval is $to_result
    echo Checking maxadmin output sanity
 
    #: here you need to change/add to your servers names
    #: so that can be filtered out of the grep command
    grep1=$(grep box03 $fileName) #: my current master
    grep2=$(grep box04 $fileName) #: my slave01
    grep3=$(grep box05 $fileName) #: my slave02
 
    if [ "$grep1" ] && [ "$grep2" ] && [ "$grep3" ]; then
         echo All is fine
         exit 0
    else
        echo Something is wrong
        exit 3
    fi
fi

Adjust permissions:

chmod u+x /usr/local/mariadb_rdba/maxping.sh
chown keepalived_script:root /usr/local/mariadb_rdba/maxping.sh

The above script can for sure be improved, but, it fine does what it promises.

Add the required user to execute scripts on behalf of keepalived on all MaxScale instances

$ useradd -U -M -s /sbin/nologin keepalived_script

Configure Keepalived and MaxScale to start on boot

$ systemctl enable keepalived.service
$ systemctl start keepalived.service
$ systemctl status keepalived.service | grep active
 
$ systemctl enable maxscale.service
$ systemctl start maxscale.service
$ systemctl status maxscale.service | grep active

After starting up the keepalived service, you can assess the VIP on the MASTER side, knowing that the MASTER will be the host with the keepalived configurations with the lowest priority. Below you can notice that I’m using the value configured at the interface parameter, th1 to filter results so we can see better the VIP added to that interface on MASTER:

[root@box01 ~]# ip addr | grep eth1
3: eth1: <BROADCAST,MULTICAST,UP,LOWER_UP> mtu 1500 qdisc pfifo_fast state UP group default qlen 1000
inet 10.0.0.11/24 brd 10.0.0.255 scope global noprefixroute eth1
inet 10.0.0.100/32 scope global eth1

Now you can ping the VIP:

[root@box01 ~]# ping -c 10 10.0.0.100
PING 10.0.0.100 (10.0.0.100) 56(84) bytes of data.
64 bytes from 10.0.0.100: icmp_seq=1 ttl=64 time=0.028 ms
64 bytes from 10.0.0.100: icmp_seq=2 ttl=64 time=0.026 ms
64 bytes from 10.0.0.100: icmp_seq=3 ttl=64 time=0.037 ms
64 bytes from 10.0.0.100: icmp_seq=4 ttl=64 time=0.038 ms
64 bytes from 10.0.0.100: icmp_seq=5 ttl=64 time=0.029 ms
64 bytes from 10.0.0.100: icmp_seq=6 ttl=64 time=0.030 ms
64 bytes from 10.0.0.100: icmp_seq=7 ttl=64 time=0.030 ms
64 bytes from 10.0.0.100: icmp_seq=8 ttl=64 time=0.036 ms
64 bytes from 10.0.0.100: icmp_seq=9 ttl=64 time=0.031 ms
64 bytes from 10.0.0.100: icmp_seq=10 ttl=64 time=0.028 ms
 
--- 10.0.0.100 ping statistics ---
10 packets transmitted, 10 received, 0% packet loss, time 9025ms
rtt min/avg/max/mdev = 0.026/0.031/0.038/0.005 ms

And also test the access to the backends through MaxScale:

[root@box01 ~]# mysqladmin -umaxmon -p321 -h10.0.0.100 ping
mysqld is alive

PS: maxmon is a user I always use on my setups for the MaxScale GaleraMon/MariaDBMon.

Monitor the syslog to observe the transitions

Syslog is your friend in this scenario after and tailing it you can see the transitions, when the IP is attached/detached to/from interfaces:

#: starting the MASTER keepalived
Mar 6 21:09:47 box01 systemd: Starting LVS and VRRP High Availability Monitor...
Mar 6 21:09:47 box01 Keepalived[29208]: Starting Keepalived v1.3.5 (03/19,2017), git commit v1.3.5-6-g6fa32f2
Mar 6 21:09:47 box01 Keepalived[29208]: Opening file '/etc/keepalived/keepalived.conf'.
Mar 6 21:09:47 box01 systemd: PID file /var/run/keepalived.pid not readable (yet?) after start.
Mar 6 21:09:47 box01 Keepalived[29209]: Starting Healthcheck child process, pid=29210
Mar 6 21:09:47 box01 Keepalived[29209]: Starting VRRP child process, pid=29211
Mar 6 21:09:47 box01 systemd: Started LVS and VRRP High Availability Monitor.
Mar 6 21:09:47 box01 Keepalived_healthcheckers[29210]: Opening file '/etc/keepalived/keepalived.conf'.
Mar 6 21:09:47 box01 Keepalived_vrrp[29211]: Registering Kernel netlink reflector
Mar 6 21:09:47 box01 Keepalived_vrrp[29211]: Registering Kernel netlink command channel
Mar 6 21:09:47 box01 Keepalived_vrrp[29211]: Registering gratuitous ARP shared channel
Mar 6 21:09:47 box01 Keepalived_vrrp[29211]: Opening file '/etc/keepalived/keepalived.conf'.
Mar 6 21:09:47 box01 Keepalived_vrrp[29211]: Truncating auth_pass to 8 characters
Mar 6 21:09:47 box01 Keepalived_vrrp[29211]: VRRP_Instance(VI_1) removing protocol VIPs.
Mar 6 21:09:47 box01 Keepalived_vrrp[29211]: Using LinkWatch kernel netlink reflector...
Mar 6 21:09:47 box01 Keepalived_vrrp[29211]: VRRP sockpool: [ifindex(3), proto(112), unicast(0), fd(10,11)]
Mar 6 21:09:47 box01 Keepalived_vrrp[29211]: VRRP_Script(chk_myscript) succeeded
Mar 6 21:09:48 box01 Keepalived_vrrp[29211]: VRRP_Instance(VI_1) Transition to MASTER STATE
Mar 6 21:09:49 box01 Keepalived_vrrp[29211]: VRRP_Instance(VI_1) Entering MASTER STATE
Mar 6 21:09:49 box01 Keepalived_vrrp[29211]: VRRP_Instance(VI_1) setting protocol VIPs.
Mar 6 21:09:49 box01 Keepalived_vrrp[29211]: Sending gratuitous ARP on eth1 for 10.0.0.100
Mar 6 21:09:49 box01 Keepalived_vrrp[29211]: VRRP_Instance(VI_1) Sending/queueing gratuitous ARPs on eth1 for 10.0.0.100
Mar 6 21:09:49 box01 Keepalived_vrrp[29211]: Sending gratuitous ARP on eth1 for 10.0.0.100
Mar 6 21:09:49 box01 Keepalived_vrrp[29211]: Remote SMTP server [177.185.201.253]:25 connected.
 
#: starting the BACKUP keepalived
Mar 6 21:10:35 box02 systemd: Starting LVS and VRRP High Availability Monitor...
Mar 6 21:10:35 box02 Keepalived[27512]: Starting Keepalived v1.3.5 (03/19,2017), git commit v1.3.5-6-g6fa32f2
Mar 6 21:10:35 box02 Keepalived[27512]: Opening file '/etc/keepalived/keepalived.conf'.
Mar 6 21:10:35 box02 systemd: PID file /var/run/keepalived.pid not readable (yet?) after start.
Mar 6 21:10:35 box02 Keepalived[27513]: Starting Healthcheck child process, pid=27514
Mar 6 21:10:35 box02 Keepalived[27513]: Starting VRRP child process, pid=27515
Mar 6 21:10:35 box02 systemd: Started LVS and VRRP High Availability Monitor.
Mar 6 21:10:35 box02 Keepalived_vrrp[27515]: Registering Kernel netlink reflector
Mar 6 21:10:35 box02 Keepalived_vrrp[27515]: Registering Kernel netlink command channel
Mar 6 21:10:35 box02 Keepalived_vrrp[27515]: Registering gratuitous ARP shared channel
Mar 6 21:10:35 box02 Keepalived_vrrp[27515]: Opening file '/etc/keepalived/keepalived.conf'.
Mar 6 21:10:35 box02 Keepalived_healthcheckers[27514]: Opening file '/etc/keepalived/keepalived.conf'.
Mar 6 21:10:35 box02 Keepalived_vrrp[27515]: Truncating auth_pass to 8 characters
Mar 6 21:10:35 box02 Keepalived_vrrp[27515]: VRRP_Instance(VI_1) removing protocol VIPs.
Mar 6 21:10:35 box02 Keepalived_vrrp[27515]: Using LinkWatch kernel netlink reflector...
Mar 6 21:10:35 box02 Keepalived_vrrp[27515]: VRRP_Instance(VI_1) Entering BACKUP STATE
Mar 6 21:10:35 box02 Keepalived_vrrp[27515]: VRRP sockpool: [ifindex(3), proto(112), unicast(0), fd(10,11)]
Mar 6 21:10:35 box02 Keepalived_vrrp[27515]: Remote SMTP server [177.185.201.253]:25 connected.
Mar 6 21:10:36 box02 Keepalived_vrrp[27515]: VRRP_Instance(VI_1) Now in FAULT state
Mar 6 21:10:36 box02 Keepalived_vrrp[27515]: VRRP_Script(chk_myscript) succeeded
Mar 6 21:10:37 box02 Keepalived_vrrp[27515]: VRRP_Instance(VI_1) Entering BACKUP STATE
Mar 6 21:10:37 box02 Keepalived_vrrp[27515]: Remote SMTP server [177.185.201.253]:25 connected.

If you need to force the failover to test transitions manually, edit the keepalived.conf and consider that, the host configured with the lowest priority will be the MASTER. One more hint is that this is all running in 5 Vagrant VMs so when you have private IPs and a virtualbox__intnet, it’s going form an internal network, and you have a range of IPs available to you. As we did here, pick up one to be the VIP and move forward.

About Transitions:

One thing to note accessing the syslog (/var/log/messages in our case) is that you can see the negotiation about who is the MASTER and who is the BACKUP. Starting up the keepalived on both boxes, you can see this below sequence:

Mar 29 17:48:29 box01 Keepalived[8569]: Starting Healthcheck child process, pid=8570
Mar 29 17:48:29 box01 Keepalived[8569]: Starting VRRP child process, pid=8571
Mar 29 17:48:29 box01 systemd: Started LVS and VRRP High Availability Monitor.
Mar 29 17:48:29 box01 Keepalived_healthcheckers[8570]: Opening file '/etc/keepalived/keepalived.conf'.
Mar 29 17:48:29 box01 Keepalived_vrrp[8571]: Registering Kernel netlink reflector
Mar 29 17:48:29 box01 Keepalived_vrrp[8571]: Registering Kernel netlink command channel
Mar 29 17:48:29 box01 Keepalived_vrrp[8571]: Registering gratuitous ARP shared channel
Mar 29 17:48:29 box01 Keepalived_vrrp[8571]: Opening file '/etc/keepalived/keepalived.conf'.
Mar 29 17:48:29 box01 Keepalived_vrrp[8571]: VRRP_Instance(VI_1) removing protocol VIPs.
Mar 29 17:48:29 box01 Keepalived_vrrp[8571]: Using LinkWatch kernel netlink reflector...
Mar 29 17:48:29 box01 Keepalived_vrrp[8571]: VRRP sockpool: [ifindex(3), proto(112), unicast(0), fd(10,11)]
Mar 29 17:48:29 box01 Keepalived_vrrp[8571]: VRRP_Instance(VI_1) Transition to MASTER STATE
Mar 29 17:48:30 box01 Keepalived_vrrp[8571]: VRRP_Instance(VI_1) Entering FAULT STATE
Mar 29 17:48:30 box01 Keepalived_vrrp[8571]: VRRP_Instance(VI_1) Now in FAULT state
Mar 29 17:48:35 box01 Keepalived_vrrp[8571]: VRRP_Script(chk_myscript) succeeded
Mar 29 17:48:36 box01 Keepalived_vrrp[8571]: VRRP_Instance(VI_1) Entering BACKUP STATE
Mar 29 17:48:37 box01 Keepalived_vrrp[8571]: VRRP_Instance(VI_1) forcing a new MASTER election
Mar 29 17:48:38 box01 Keepalived_vrrp[8571]: VRRP_Instance(VI_1) Transition to MASTER STATE
Mar 29 17:48:39 box01 Keepalived_vrrp[8571]: VRRP_Instance(VI_1) Entering MASTER STATE
Mar 29 17:48:39 box01 Keepalived_vrrp[8571]: VRRP_Instance(VI_1) setting protocol VIPs.
Mar 29 17:48:39 box01 Keepalived_vrrp[8571]: Sending gratuitous ARP on eth1 for 10.0.0.100
Mar 29 17:48:39 box01 Keepalived_vrrp[8571]: VRRP_Instance(VI_1) Sending/queueing gratuitous ARPs on eth1 for 10.0.0.100
Mar 29 17:48:39 box01 Keepalived_vrrp[8571]: Sending gratuitous ARP on eth1 for 10.0.0.100
Mar 29 17:48:44 box01 Keepalived_vrrp[8571]: Sending gratuitous ARP on eth1 for 10.0.0.100
Mar 29 17:48:44 box01 Keepalived_vrrp[8571]: VRRP_Instance(VI_1) Sending/queueing gratuitous ARPs on eth1 for 10.0.0.100
Mar 29 17:48:44 box01 Keepalived_vrrp[8571]: Sending gratuitous ARP on eth1 for 10.0.0.100

From the above, you can clearly see who is the current MASTER. But, how is it on the BACKUP side?

Mar 29 17:52:49 box02 Keepalived[5524]: Starting Healthcheck child process, pid=5525
Mar 29 17:52:49 box02 Keepalived[5524]: Starting VRRP child process, pid=5526
Mar 29 17:52:49 box02 systemd: Started LVS and VRRP High Availability Monitor.
Mar 29 17:52:49 box02 Keepalived_healthcheckers[5525]: Opening file '/etc/keepalived/keepalived.conf'.
Mar 29 17:52:49 box02 Keepalived_vrrp[5526]: Registering Kernel netlink reflector
Mar 29 17:52:49 box02 Keepalived_vrrp[5526]: Registering Kernel netlink command channel
Mar 29 17:52:49 box02 Keepalived_vrrp[5526]: Registering gratuitous ARP shared channel
Mar 29 17:52:49 box02 Keepalived_vrrp[5526]: Opening file '/etc/keepalived/keepalived.conf'.
Mar 29 17:52:49 box02 Keepalived_vrrp[5526]: VRRP_Instance(VI_1) removing protocol VIPs.
Mar 29 17:52:49 box02 Keepalived_vrrp[5526]: Using LinkWatch kernel netlink reflector...
Mar 29 17:52:49 box02 Keepalived_vrrp[5526]: VRRP sockpool: [ifindex(3), proto(112), unicast(0), fd(10,11)]
Mar 29 17:52:49 box02 Keepalived_vrrp[5526]: VRRP_Script(chk_myscript) succeeded
Mar 29 17:52:49 box02 Keepalived_vrrp[5526]: VRRP_Instance(VI_1) Transition to MASTER STATE
Mar 29 17:52:49 box02 Keepalived_vrrp[5526]: VRRP_Instance(VI_1) Received advert with higher priority 101, ours 100
Mar 29 17:52:49 box02 Keepalived_vrrp[5526]: VRRP_Instance(VI_1) Entering BACKUP STATE

You see the priority comparison between the two hosts and win the one having the highest vrrp_scrip.priority.

In the end, what you see is the VIP added to the vrrp_scrip.interface on the MASTER:

[root@box01 ~]# ip addr show eth1
3: eth1: <BROADCAST,MULTICAST,UP,LOWER_UP> mtu 1500 qdisc pfifo_fast state UP group default qlen 1000
    link/ether 08:00:27:09:15:27 brd ff:ff:ff:ff:ff:ff
    inet 10.0.0.11/24 brd 10.0.0.255 scope global noprefixroute eth1
       valid_lft forever preferred_lft forever
    inet 10.0.0.100/24 scope global secondary eth1
       valid_lft forever preferred_lft forever
    inet6 fe80::a00:27ff:fe09:1527/64 scope li

MaxScale Passive Mode

When running the MaxScale HA with keepalived and dealing with Replication Clusters, we need to protect the environment against operational mistakes that could happen as both sides the MASTER and the BACKUP MaxScales will have MaxScale instances up and running and accepting connections, despite of just one side being active at-a-time as the VIP in one side only (unless you resolve to do bad things and point the so-called small apps to the passive MaxScale endpoint directly – this is bad!!). To protect the environment, MaxScale can be set in Passive mode and in that mode, the switchover/failover/automatic rejoin won’t be triggered. These operations will be triggered only on the active MaxScale.

#!/bin/bash
 
TYPE=$1
NAME=$2
STATE=$3
 
OUTFILE=/tmp/maxify.log
 
case $STATE in
  "MASTER") echo "Setting this MaxScale node to active mode" > $OUTFILE
                  maxctrl alter maxscale passive false
                  exit 0
                  ;;
  "BACKUP") echo "Setting this MaxScale node to passive mode" > $OUTFILE
                  maxctrl alter maxscale passive true
                  exit 0
                  ;;
  "FAULT")  echo "MaxScale failed the status check." > $OUTFILE
                  maxctrl alter maxscale passive true
                  exit 0
                  ;;
        *)        echo "Unknown state" > $OUTFILE
                  exit 1
                  ;;
esac

Adjust then the script permissions and ownership:

#: the maxify need to be like the below
chmod u+x /usr/local/mariadb_rdba/maxify.sh
chown keepalived_script:root /usr/local/mariadb_rdba/maxify.sh

Additional notes:

On some setups and implementations, I’ve seen the signal 15 being sent to the keepalived process what can make a transition to happen. Looking to see if other users have the same issue, I found this post on GitHub. The recommendation was to add a local DNS resolution and increase the vrrp_scrip.interval from the current value to something else bigger so the problem can be solved. The events appearing on syslog is like the ones below:

Mar  7 20:36:06 box01 Keepalived_vrrp[29211]: VRRP_Script(chk_myscript) timed out
Mar  7 20:36:06 box01 Keepalived_vrrp[29211]: VRRP_Instance(VI_1) Entering FAULT STATE
Mar  7 20:36:06 box01 Keepalived_vrrp[29211]: VRRP_Instance(VI_1) removing protocol VIPs.
Mar  7 20:36:06 box01 Keepalived_vrrp[29211]: VRRP_Instance(VI_1) Now in FAULT state
Mar  7 20:36:06 box01 Keepalived_vrrp[29211]: /usr/local/mariadb_rdba/maxping.sh exited due to signal 15
Mar  7 20:36:08 box01 Keepalived_vrrp[29211]: /usr/local/mariadb_rdba/maxping.sh exited due to signal 15
Mar  7 20:36:12 box01 Keepalived_vrrp[29211]: /usr/local/mariadb_rdba/maxping.sh exited due to signal 15
Mar  7 20:36:14 box01 Keepalived_vrrp[29211]: /usr/local/mariadb_rdba/maxping.sh exited due to signal 15
Mar  7 20:36:16 box01 Keepalived_vrrp[29211]: /usr/local/mariadb_rdba/maxping.sh exited due to signal 15
Mar  7 20:36:18 box01 Keepalived_vrrp[29211]: /usr/local/mariadb_rdba/maxping.sh exited due to signal 15
Mar  7 20:36:20 box01 Keepalived_vrrp[29211]: /usr/local/mariadb_rdba/maxping.sh exited due to signal 15
Mar  7 20:36:22 box01 Keepalived_vrrp[29211]: /usr/local/mariadb_rdba/maxping.sh exited due to signal 15
Mar  7 20:36:24 box01 Keepalived_vrrp[29211]: /usr/local/mariadb_rdba/maxping.sh exited due to signal 15
Mar  7 20:36:28 box01 Keepalived_vrrp[29211]: /usr/local/mariadb_rdba/maxping.sh exited due to signal 15
Mar  7 20:36:30 box01 Keepalived_vrrp[29211]: /usr/local/mariadb_rdba/maxping.sh exited due to signal 15
Mar  7 20:36:33 box01 Keepalived_vrrp[29211]: VRRP_Script(chk_myscript) succeeded
Mar  7 20:36:35 box01 Keepalived_vrrp[29211]: Kernel is reporting: interface eth1 UP
Mar  7 20:36:35 box01 Keepalived_vrrp[29211]: VRRP_Instance(VI_1): Transition to MASTER STATE
Mar  7 20:36:35 box01 Keepalived_vrrp[29211]: VRRP_Instance(VI_1) Transition to MASTER STATE
Mar  7 20:36:36 box01 Keepalived_vrrp[29211]: VRRP_Instance(VI_1) Entering MASTER STATE
Mar  7 20:36:36 box01 Keepalived_vrrp[29211]: VRRP_Instance(VI_1) setting protocol VIPs.
Mar  7 20:36:36 box01 Keepalived_vrrp[29211]: Sending gratuitous ARP on eth1 for 10.0.0.100

When debugging the above signal 15, it can interchange for signal 3 also, and considering my experience, it can be a mixture of very low timeout command within the maxping.sh and the vrrp_scrip.interval. For small boxes or even, networks with high latency, I recommend you to have greater values. It can start flapping and the IP will be moving around many times. Here you need to search a good balance. It’s good to mention that high values for the vrrp_scrip.interval will give you more time for the VRRP to realize it’s in the FAULT state and that the transition should be triggered.

Another issue you can face is when SELinux is being enforced and the below messages will appear on syslog:

Apr  4 20:49:27 uat-maxsq01 Keepalived_vrrp[7517]: Couldn't setuid: 1000 (Operation not permitted)
Apr  4 20:49:29 uat-maxsq01 Keepalived_vrrp[7519]: Couldn't setuid: 1000 (Operation not permitted)
Apr  4 20:49:31 uat-maxsq01 Keepalived_vrrp[7522]: Couldn't setuid: 1000 (Operation not permitted)
Apr  4 20:49:33 uat-maxsq01 Keepalived_vrrp[7528]: Couldn't setuid: 1000 (Operation not permitted)
Apr  4 20:49:35 uat-maxsq01 Keepalived_vrrp[7577]: Couldn't setuid: 1000 (Operation not permitted)
Apr  4 20:49:37 uat-maxsq01 Keepalived_vrrp[7580]: Couldn't setuid: 1000 (Operation not permitted)

You just need to setenforce 0 to make it able to do what it needs to do.

[root@uat-maxsq01 ~]# setenforce 0
[root@uat-maxsq01 ~]#

And then you can see the action being completed yet tailing the syslog:

Apr  4 20:50:01 uat-maxsq01 systemd: Created slice User Slice of root.
Apr  4 20:50:01 uat-maxsq01 systemd: Started Session 1415 of user root.
Apr  4 20:50:01 uat-maxsq01 systemd: Removed slice User Slice of root.

It’s clear that something else happened that made the maxping.sh script execution to fail, starting a transition on the current MASTER.

AddThis Social Bookmark Button

MariaDB Maxscale 2.1 and SSL Certificates

dezembro 18th, 2017 Bianchi Posted in Data Infrastructure, MariaDB Maxscale No Comments »

MariaDB Maxscale has become more and more popular since some time ago, and it is mostly adopted by users that would like to take advantage of a good strategy for scaling out databases and the data infrastructure. With this, of course, come together with the concerns in how to make the environment safe, adopting the best industry’s practices. Most of the MariaDB Maxscale adopters have or will have Maxscale handling traffic to database instances/backends in a wan, where servers can be added to the MariaDB’s Intelligent Database Proxy and based on the configurations, traffic is routed to those servers. We know very well that the man-in-the-middle and some other strategies to intercept information can be used while data is being replicated, while connections are routed to the backend databases.

This blog post will explore the setup of an environment using self-signed OpenSSL certificates to make it safe enough to replicate data between the multiple backend database servers and mainly, we’re going to show you how you can setup the communication between the MariaDB Maxscale and the backend.

The following are the servers and version we’re using on this blog:

  • 4 VMs vagrant-wise created:
    • 1 MariaDB Maxscale;
    • 1 MariaDB Server as Master;
    • 2 MariaDB Server as Replica;
  • CentOS 7.3 as the operating system;
  • MariaDB Server 10.2.10;
  • MariaDB Maxscale 2.1.10;

For this blog, I assume you already have the servers configured and replicating (one master and two replicas).

MariaDB Maxscale will look like this below at the end of this blog:

[root@maxscale ~]# maxadmin list servers
Servers.
-------------------+-----------------+-------+-------------+--------------------
Server             | Address         | Port  | Connections | Status
-------------------+-----------------+-------+-------------+--------------------
prod_mariadb01     | 192.168.50.11   |  3306 |           0 | Master, Running
prod_mariadb02     | 192.168.50.12   |  3306 |           0 | Slave, Running
prod_mariadb03     | 192.168.50.13   |  3306 |           0 | Slave, Running
-------------------+-----------------+-------+-------------+--------------------

If you’re following this tutorial, make sure you setup on servers the MariaDB Official repository to have access to the software we will need to set up as we go through.

#: setup MariaDB Official repository
[root@box01 ~]# curl -sS https://downloads.mariadb.com/MariaDB/mariadb_repo_setup | sudo bash
[info] Repository file successfully written to /etc/yum.repos.d/mariadb.repo.
[info] Adding trusted package signing keys...
[info] Succeessfully added trusted package signing keys.

Generating the Self-Signed Certificates

The place to start with this is to generate your self-signed OpenSSL certificates, but, if you would like to acquire a certificate for any of the existing entities that will sign the certificate for you, that’s fine as well. Here, I’m going through the creation of certificates with OpenSSL, present on most of the Linux Distributions by the default and then, I’m going to use that. Below you can find the command to generate your certificates, the same as I used to generate the certificates at /etc/my.cnf.d/certs/. One detail here is that you won’t see this directory on the MariaDB Maxscale host, so, you will need to create that directory and move certs there.

[root@maxscale ~]# mkdir -pv /etc/my.cnf.d/certs/
mkdir: created directory ‘/etc/my.cnf.d/certs/’

[root@box01 ~]# mkdir -pv /etc/my.cnf.d/certs/
mkdir: created directory ‘/etc/my.cnf.d/certs/’

[root@box02 ~]# mkdir -pv /etc/my.cnf.d/certs/
mkdir: created directory ‘/etc/my.cnf.d/certs/’

[root@box03 ~]# mkdir -pv /etc/my.cnf.d/certs/
mkdir: created directory ‘/etc/my.cnf.d/certs/’

I created the directory on the MariaDB Maxscale server host, moved my prompt to /etc/my.cnf.d/certs/ and then, created the certificates using the below commands.

#: generate the ca-key
$ openssl genrsa 2048 > ca-key.pem

#: server certs
$ openssl req -new -x509 -nodes -days 9999 -key ca-key.pem > ca-cert.pem
$ openssl req -newkey rsa:2048 -days 1000 -nodes -keyout server-key.pem > server-req.pem
$ openssl x509 -req -in server-req.pem -days 3600 -CA ca-cert.pem -CAkey ca-key.pem -set_serial 01 -out server-cert.pem

#: client certs
$ openssl req -newkey rsa:2048 -days 3600 -nodes -keyout client-key.pem -out client-req.pem
$ openssl rsa -in client-key.pem -out client-key.pem
$ openssl x509 -req -in client-req.pem -days 3600 -CA ca-cert.pem -CAkey ca-key.pem -set_serial 01 -out client-cert.pem

#: verify generated certificates
$ openssl verify -CAfile ca-cert.pem server-cert.pem client-cert.pem
server-cert.pem: OK
client-cert.pem: OK

One thing you should be aware of if the last part doesn’t go well and the certificates verifications don’t give you an OK is that you need to have different names for the CN or Common Names. The error that appeared sometimes is like the one below:

#: execution the SSL certificates verification
$ openssl verify -CAfile ca-cert.pem server-cert.pem client-cert.pem
server-cert.pem: C = BR, ST = MG, L = BH, O = WBC, OU = WB, CN = WB, emailAddress = me@all.com
error 18 at 0 depth lookup:self signed certificate
OK
client-cert.pem: C = BR, ST = MG, L = BH, O = WBC, OU = WB, CN = WB, emailAddress = me@all.com
error 18 at 0 depth lookup:self signed certificate
OK

After finishing the certificate’s creation successfully and then, pass through the verification, as shown above, you will have the following files at /etc/my.cnf.d/certs/:

#: listing servers on MariaDB Maxscale server host
[root@maxscale ~]# ls -lh /etc/my.cnf.d/certs/
total 32K
-rw-r--r-- 1 root root 1.4K Nov  5 11:08 ca-cert.pem
-rw-r--r-- 1 root root 1.7K Nov  5 11:07 ca-key.pem
-rw-r--r-- 1 root root 1.3K Nov  5 11:11 client-cert.pem
-rw-r--r-- 1 root root 1.7K Nov  5 11:11 client-key.pem
-rw-r--r-- 1 root root 1.1K Nov  5 11:10 client-req.pem
-rw-r--r-- 1 root root 1.3K Nov  5 11:09 server-cert.pem
-rw-r--r-- 1 root root 1.7K Nov  5 11:09 server-key.pem
-rw-r--r-- 1 root root 1.1K Nov  5 11:09 server-req.pem

Now you do have the client’s and server’s certificates you need to go ahead with this setup.

Setting Up GTID Replication SSL Based

If you got new servers, maybe it’s just easy enough to say that, to configure replication SSL based, you need to have a user for each of the slaves/replicas you plan to have under your master server or as well, you can have a specialized user create for connecting to your master from an IP using a wildcard, such as 192.168.100.%. I will encourage you to have one user per slave/replica as it can enforce the security of your environment and avoid other issues like someone else on the same network trying to gain access on the master database. It’s OK that the replication user just has REPLICATION SLAVE and REPLICATION CLIENT privileges, but, you never know what is gonna be attempted. By the way, following what should be done, you have the following:

  1. Move client certificates to all 3 servers, adding certificates at /etc/my.cnf.d/certs/ (you need to create this directory on all four servers);
  2. Add a file under the /etc/my.cnf.d names ssl.cnf as MariaDB will read that when it starts up mysqld;
  3. Create the users, one for each of the slaves, on master with the directive REQUIRE SSL;
  4. Configure replication on slaves/replicas with that user and using the required MASTER_SSL directives on the CHANGE MASTER TO command.

To move files around, I like to have a key based authentication configured to makes things easier as you don’t need to digit passwords anymore after getting keys in place on all the servers. You can generate you a key on each of the servers, copy them all them all to the ~/.ssh/authorized_keys file on the central servers, which in my case is the MariaDB Maxscale server host and them, send the files to all the servers. One additional thing you need to pay attention, in this case, is that the authorized_keys file should have permission set as 0600 to make it work. So, this is a way to go, or, you can use your user’s password as well, it’s gonna work. You can as well for sure streamline the process like below (it’s a very bad behavior generate a key without a passphrase, so, consider a passphrase to your keys to make it safer):

#: generate a simple key, you can have a strong one
#: if you go create it on production
[root@maxscale ~]# ssh-keygen
Generating public/private rsa key pair.
Enter file in which to save the key (/root/.ssh/id_rsa):
Enter passphrase (empty for no passphrase):
Enter same passphrase again:
Your identification has been saved in /root/.ssh/id_rsa.
Your public key has been saved in /root/.ssh/id_rsa.pub.
[...snip...]

Let’s get key published on database servers:

#: adding the public key on the other hosts
[root@maxscale ~]# for i in {11..13}; do ssh-copy-id -i ~/.ssh/id_rsa.pub 192.168.50.$i; done
/bin/ssh-copy-id: INFO: attempting to log in with the new key(s), to filter out any that are already installed
/bin/ssh-copy-id: INFO: 1 key(s) remain to be installed -- if you are prompted now it is to install the new keys
root@192.168.50.11's password:
Number of key(s) added: 1
Now try logging into the machine, with: "ssh '192.168.50.11'"
and check to make sure that only the key(s) you wanted were added.

/bin/ssh-copy-id: INFO: attempting to log in with the new key(s), to filter out any that are already installed
/bin/ssh-copy-id: INFO: 1 key(s) remain to be installed -- if you are prompted now it is to install the new keys
root@192.168.50.12's password:
Number of key(s) added: 1
Now try logging into the machine, with: "ssh '192.168.50.12'"
and check to make sure that only the key(s) you wanted were added.

/bin/ssh-copy-id: INFO: attempting to log in with the new key(s), to filter out any that are already installed
/bin/ssh-copy-id: INFO: 1 key(s) remain to be installed -- if you are prompted now it is to install the new keys
root@192.168.50.13's password:
Number of key(s) added: 1
Now try logging into the machine, with: "ssh '192.168.50.13'"
and check to make sure that only the key(s) you wanted were added.

#: testing if key based SSH is all set
[root@maxscale ~]# for i in {11..13}; do ssh 192.168.50.$i hostname; done
box01
box02
box03

Once SSH keys are in place, we can just move the certificates from your central host to the others; I use rsync for the below task and as a hint, you will need to have it on all servers:

#: moving certificates for database hosts
[root@maxscale ~]# for i in {11..13}; do rsync -avrP -e ssh /etc/my.cnf.d/certs/* 192.168.50.$i:/etc/my.cnf.d/certs/; done
sending incremental file list
ca-cert.pem
  1261 100% 0.00kB/s 0:00:00 (xfer#1, to-check=7/8)
ca-key.pem
  1675 100% 1.60MB/s 0:00:00 (xfer#2, to-check=6/8)
client-cert.pem
  1135 100% 1.08MB/s 0:00:00 (xfer#3, to-check=5/8)
client-key.pem
  1675 100% 1.60MB/s 0:00:00 (xfer#4, to-check=4/8)
client-req.pem
  976 100% 953.12kB/s 0:00:00 (xfer#5, to-check=3/8)
server-cert.pem
  1135 100% 1.08MB/s 0:00:00 (xfer#6, to-check=2/8)
server-key.pem
  1704 100% 1.63MB/s 0:00:00 (xfer#7, to-check=1/8)
server-req.pem
  976 100% 953.12kB/s 0:00:00 (xfer#8, to-check=0/8)
 
sent 11046 bytes received 164 bytes 22420.00 bytes/sec
total size is 10537 speedup is 0.94
[...snip...]

Once certificates are located on all servers, next step is to add the ssl.cnf at /etc/my.cnf.d, as below:

#: add the below as a content of the file /etc/my.cnf.d/ssl.cnf
[root@box01 ~]# cat /etc/my.cnf.d/ssl.cnf
[client]
ssl
ssl-ca=/etc/my.cnf.d/certs/ca-cert.pem
ssl-cert=/etc/my.cnf.d/certs/client-cert.pem
ssl-key=/etc/my.cnf.d/certs/client-key.pem
[mysqld]
ssl
ssl-ca=/etc/my.cnf.d/certs/ca-cert.pem
ssl-cert=/etc/my.cnf.d/certs/server-cert.pem
ssl-key=/etc/my.cnf.d/certs/server-key.pem

You should restart your MariaDB Server after adding the certificates configuration, as if you don’t, it’s not going to be possible to connect to the database server with the users we created. In case something goes wrong with certificates, and you need to generate new ones, repeating the process aforementioned, you’ll need to restart database servers as client certificates are loaded to the memory, and you can get an error like below if you have a certificates mismatch:

[root@box01 certs]# mysql
ERROR 2026 (HY000): SSL connection error: error:14090086:SSL routines:SSL3_GET_SERVER_CERTIFICATE:certificate verify failed

Let’s now create a specific replication user for each of the servers we have on our replication topology currently:

box01 [(none)]> CREATE USER repl_ssl@'192.168.50.11' IDENTIFIED BY '123456';
Query OK, 0 rows affected (0.00 sec)

box01 [(none)]> GRANT REPLICATION SLAVE, REPLICATION CLIENT ON *.* TO repl_ssl@'192.168.50.11' REQUIRE SSL;
Query OK, 0 rows affected (0.00 sec)

box01 [(none)]> CREATE USER repl_ssl@'192.168.50.12' IDENTIFIED BY '123456';
Query OK, 0 rows affected (0.00 sec)

box01 [(none)]> GRANT REPLICATION SLAVE, REPLICATION CLIENT ON *.* TO repl_ssl@'192.168.50.12' REQUIRE SSL;
Query OK, 0 rows affected (0.00 sec)

box01 [(none)]> CREATE USER repl_ssl@'192.168.50.13' IDENTIFIED BY '123456';
Query OK, 0 rows affected (0.00 sec)

box01 [(none)]> GRANT REPLICATION SLAVE, REPLICATION CLIENT ON *.* TO repl_ssl@'192.168.50.13' REQUIRE SSL;
Query OK, 0 rows affected (0.00 sec)

Above, we created one user per server, and I did that thinking at the moment that we eventually need to switch over the current master to one of the slaves, so, that way, the replication user don’t need to be of concern when dealing with an emergency or even when a planned failover is required. The next step should be thought in your case, and I’m going to simplify the case here and assume we’re working with a new environment, not in production yet. For changing your production environment to use SSL certificates, you need to spend more time on this, planning it well to avoid services disruptions. So, I’m going to grab the replication coordinates on the master, out of SHOW MASTER STATUS and then, issue the command CHANGE MASTER TO on slaves to get replication going. Here, I assumed you moved all the certs to all database servers, and they are living at /etc/my.cnf.d/certs/.

#: getting the current master status
box01 [(none)]> show master status\G
*************************** 1. row ***************************
            File: box01-bin.000024
        Position: 877
    Binlog_Do_DB:
Binlog_Ignore_DB:
1 row in set (0.00 sec)

#: the CHANGE MASTER TO command should be something like the below
box02 [(none)]> CHANGE MASTER TO MASTER_HOST='192.168.50.11',
  -> MASTER_USER='repl_ssl',
  -> MASTER_PASSWORD='123456',
  -> MASTER_LOG_FILE='box01-bin.000024',
  -> MASTER_LOG_POS=877,
  -> MASTER_SSL=1,
  -> MASTER_SSL_CA='/etc/my.cnf.d/certs/ca-cert.pem',
  -> MASTER_SSL_CERT='/etc/my.cnf.d/certs/client-cert.pem',
  -> MASTER_SSL_KEY='/etc/my.cnf.d/certs/client-key.pem';
Query OK, 0 rows affected (0.05 sec)

box02 [(none)]> start slave;
Query OK, 0 rows affected (0.00 sec)

box02 [(none)]> show slave status\G
*************************** 1. row ***************************
  Slave_IO_State: Waiting for master to send event
  Master_Host: 192.168.50.11
  Master_User: repl_ssl
  Master_Port: 3306
  Connect_Retry: 3
  Master_Log_File: box01-bin.000028
  Read_Master_Log_Pos: 794
  Relay_Log_File: box02-relay-bin.000006
  Relay_Log_Pos: 1082
  Relay_Master_Log_File: box01-bin.000028
  Slave_IO_Running: Yes
  Slave_SQL_Running: Yes
  [...snip...]
  Master_SSL_Allowed: Yes
  Master_SSL_CA_File: /etc/my.cnf.d/certs/ca-cert.pem
  Master_SSL_CA_Path:
  Master_SSL_Cert: /etc/my.cnf.d/certs/client-cert.pem
  Master_SSL_Cipher:
  Master_SSL_Key: /etc/my.cnf.d/certs/client-key.pem
  Seconds_Behind_Master: 0
  Last_IO_Errno: 0
  Last_IO_Error:
  Last_SQL_Errno: 0
  Last_SQL_Error:
  Replicate_Ignore_Server_Ids:
  Master_Server_Id: 1
  Master_SSL_Crl: /etc/my.cnf.d/certs/ca-cert.pem
  Master_SSL_Crlpath:
  Using_Gtid: No
  Gtid_IO_Pos:
  Replicate_Do_Domain_Ids:
  Replicate_Ignore_Domain_Ids:
  Parallel_Mode: conservative
1 row in set (0.00 sec)

You can use GTIDs as well, and then, you CHANGE MASTER TO command will be something like:

box03 [(none)]> CHANGE MASTER TO MASTER_HOST='192.168.50.11',
  -> MASTER_USER='repl_ssl',
  -> MASTER_PASSWORD='123456',
  -> MASTER_USE_GTID=SLAVE_POS,
  -> MASTER_SSL=1,
  -> MASTER_SSL_CA='/etc/my.cnf.d/certs/ca-cert.pem',
  -> MASTER_SSL_CERT='/etc/my.cnf.d/certs/client-cert.pem',
  -> MASTER_SSL_KEY='/etc/my.cnf.d/certs/client-key.pem';
Query OK, 0 rows affected (0.05 sec)

box03 [(none)]> start slave;
Query OK, 0 rows affected (0.04 sec)

box03 [(none)]> show slave status\G
*************************** 1. row ***************************
  Slave_IO_State: Waiting for master to send event
  Master_Host: 192.168.50.11
  Master_User: repl_ssl
  Master_Port: 3306
  Connect_Retry: 3
  Master_Log_File: box01-bin.000028
  Read_Master_Log_Pos: 794
  Relay_Log_File: box03-relay-bin.000002
  Relay_Log_Pos: 654
  Relay_Master_Log_File: box01-bin.000028
  Slave_IO_Running: Yes
  Slave_SQL_Running: Yes
  [...snip...]
  Master_SSL_Allowed: Yes
  Master_SSL_CA_File: /etc/my.cnf.d/certs/ca-cert.pem
  Master_SSL_CA_Path:
  Master_SSL_Cert: /etc/my.cnf.d/certs/client-cert.pem
  Master_SSL_Cipher:
  Master_SSL_Key: /etc/my.cnf.d/certs/client-key.pem
  Seconds_Behind_Master: 0
  Last_IO_Errno: 0
  Last_IO_Error:
  Last_SQL_Errno: 0
  Last_SQL_Error:
  Replicate_Ignore_Server_Ids:
  Master_Server_Id: 1
  Master_SSL_Crl: /etc/my.cnf.d/certs/ca-cert.pem
  Master_SSL_Crlpath:
  Using_Gtid: Slave_Pos
  Gtid_IO_Pos: 0-1-911075
  Replicate_Do_Domain_Ids:
  Replicate_Ignore_Domain_Ids:
  Parallel_Mode: conservative
1 row in set (0.00 sec)

One of the things you can check at the end to make sure replication is all set is of course if error log gives you a clear view of everything that was set up until now and if you added the variable report_host, you could see the result of SHOW SLAVE HOSTS on the master like below:

box01 [(none)]> show slave hosts\G 
*************************** 1. row ***************************
Server_id: 3
  Host: box03.wb.com
  Port: 3306
Master_id: 1

*************************** 2. row ***************************
Server_id: 2
  Host: box02.wb.com
  Port: 3306
Master_id: 1
2 rows in set (0.00 sec)

Unfortunately, the @@report_host is not a dynamic system variable, and you need to add it to the MariaDB Server configuration file and restart mysqld to make it assume the new value.  It’s passed to the master when the slave/replica’s IO_THREAD establish the connection with the master (handshake process).   Setting Up MariaDB Maxscale and the ReadWriteSplit SSL Based   Until here, we went through the details of each of the configurations from the certificates generation, replication configuration, and setup. Now, we need to go over the Maxscale installation; the commands required to dynamically create the monitor, a service, a listener and add servers to have at the end the configurations for the ReadWriteSplit router to handle reads and writes for the master and slaves.

The steps here will be:

  1. Setup MariaDB Maxscale;
  2. Put together a basic configuration for MariaDB Maxscale and start it;
  3. Create a user for the Maxscale’s Service and another one for the Monitor on backends with the REQUIRE SSL;
  4. Add SSL certificates to the server’s and listener definitions files;
  5. Run commands that will create a monitor, a listener, a service; we will then create the servers and add them to the monitor;
  6. Create a user for the application on backends.

To setup MariaDB Maxscale (when writing this blog, it was at its 2.1.10 version), run the below knowing that the MariaDB Official repository was set up at the very beginning of this exercise:

#: setting up MariaDB Maxscale
[root@maxscale ~]# yum install maxscale -y

Loaded plugins: fastestmirror

Loading mirror speeds from cached hostfile
 * base: mirror.nbtelecom.com.br
 * epel: mirror.cedia.org.ec
 * extras: mirror.nbtelecom.com.br
 * updates: mirror.nbtelecom.com.br

Resolving Dependencies
--> Running transaction check
---> Package maxscale.x86_64 0:2.1.10-1 will be updated
---> Package maxscale.x86_64 0:2.1.11-1 will be an update
--> Finished Dependency Resolution
[...snip...]

[root@maxscale maxscale.cnf.d]# maxscale --version
MaxScale 2.1.11

You will notice that the password for the maxuser_ssl and maxmon_ssl users is a kind of hash. It was generated using maxkeys to avoid clean text, as you can see below. You will be required to configure yours instead of using the below one.

#: create the secrets file, by default at /var/lib/maxscale 
[root@maxscale ~]# maxkeys
Generating .secrets file in /var/lib/maxscale.

#: the password configured on database servers, but encrypted for maxscale configs
[root@maxscale ~]# maxpasswd /var/lib/maxscale/ 123456
AF76BE841B5B4692D820A49298C00272

#: change the file /var/lib/maxscale/.secrets ownership
[root@maxscale ~]# chown maxscale:maxscale /var/lib/maxscale/.secrets

Let’s now put together a basic configuration to start MariaDB Maxscale. Add the below configurations to the maxscale’s configuration file so you can start maxscale:

[root@maxscale ~]# cat /etc/maxscale.cnf
[maxscale]
threads=auto
log_info=true

[rwsplit-service]
type=service
router=readwritesplit
user=maxuser_ssl
passwd=AF76BE841B5B4692D820A49298C00272

[CLI]
type=service
router=cli

[CLI Listener]
type=listener
service=CLI
protocol=maxscaled
socket=default

Before starting MariaDB Maxscale, adding a listener to the pre-defined service, a monitor and creating and adding our servers on which we set up the replication previously, we need to create users, for the service, the monitor and for the application that will connect to the backend servers through Maxscale. Below users should be created on master and then, replicate for the replicas:

#: maxscale's mysqlmon user
sudo mysql -e "grant all on *.* to maxmon_ssl@'192.168.50.100' identified by '123456' require ssl" -vvv

#: maxscale's service user
sudo mysql -e "grant all on *.* to maxuser_ssl@'192.168.50.100' identified by '123456' require ssl" -vvv

#: application user
sudo mysql -e "grant select,insert,delete,update on *.* to appuser_ssl@'192.168.%' identified by '123456' require ssl;" -vvv

Now we can start MariaDB Maxscale using the basic configuration file we just created, I created mine at /root/maxscale_configs. So, I can start Maxscale doing like below and checking the log file at /var/log/maxscale/maxscale.log:

[root@maxscale maxscale.cnf.d]# [root@maxscale certs]# systemctl start maxscale
[root@maxscale certs]# systemctl status maxscale
● maxscale.service - MariaDB MaxScale Database Proxy
   Loaded: loaded (/usr/lib/systemd/system/maxscale.service; disabled; vendor preset: disabled)
   Active: active (running) since Fri 2017-12-15 13:21:57 GMT; 5s ago
  Process: 13138 ExecStart=/usr/bin/maxscale (code=exited, status=0/SUCCESS)
  Process: 13135 ExecStartPre=/usr/bin/install -d /var/run/maxscale -o maxscale -g maxscale (code=exited, status=0/SUCCESS)
 Main PID: 13140 (maxscale)
   CGroup: /system.slice/maxscale.service
           └─13140 /usr/bin/maxscale

Dec 15 13:21:57 maxscale maxscale[13140]: Loaded module readwritesplit: V1.1.0 from /usr/lib64/maxscale/libreadwritesplit.so
Dec 15 13:21:57 maxscale maxscale[13140]: Loaded module maxscaled: V2.0.0 from /usr/lib64/maxscale/libmaxscaled.so
Dec 15 13:21:57 maxscale maxscale[13140]: Loaded module MaxAdminAuth: V2.1.0 from /usr/lib64/maxscale/libMaxAdminAuth.so
Dec 15 13:21:57 maxscale maxscale[13140]: No query classifier specified, using default 'qc_sqlite'.
Dec 15 13:21:57 maxscale maxscale[13140]: Loaded module qc_sqlite: V1.0.0 from /usr/lib64/maxscale/libqc_sqlite.so
Dec 15 13:21:57 maxscale maxscale[13140]: Service 'rwsplit-service' has no listeners defined.
Dec 15 13:21:57 maxscale maxscale[13140]: Listening for connections at [/tmp/maxadmin.sock]:0 with protocol MaxScale Admin
Dec 15 13:21:57 maxscale maxscale[13140]: MaxScale started with 1 server threads.
Dec 15 13:21:57 maxscale maxscale[13140]: Started MaxScale log flusher.
Dec 15 13:21:57 maxscale systemd[1]: Started MariaDB MaxScale Database Proxy.

At this point, the maxscale does not have anything to report in but the service we configured on the basic configuration file. That is mandatory to start Maxscale and make it happy on the first basic initialization. The log events above can show you that maxscale was started with a service but not a listener, not a monitor and no servers. So, this is what we’re going to create now, running the below commands while checking the Maxscale’s log file (below were extracted from this blog from Marküs Mäkelä and adjusted/fixed on this JIRA):

#: let's create a monitor based on the "mysqlmon"
[root@maxscale maxscale_configs]# maxadmin create monitor cluster-monitor mysqlmon
Created monitor 'cluster-monitor'
 
#: log file will tell the below
2017-10-10 15:34:31   notice : (3) [mysqlmon] Initialise the MySQL Monitor module.

#: let's alter the monitor to add some options 
[root@maxscale maxscale_configs]# maxadmin alter monitor cluster-monitor user=maxuser_ssl password=AF76BE841B5B4692D820A49298C00272 monitor_interval=10000
 
#: log file will tell you about the last changes
2017-10-10 15:34:31   notice : (3) Loaded module mysqlmon: V1.5.0 from /usr/lib64/maxscale/libmysqlmon.so
2017-10-10 15:34:31   notice : (3) Created monitor 'cluster-monitor'
2017-10-10 15:35:03   notice : (4) Updated monitor 'cluster-monitor': type=monitor
2017-10-10 15:35:03   notice : (4) Updated monitor 'cluster-monitor': user=maxuser_ssl
2017-10-10 15:35:03   notice : (4) Updated monitor 'cluster-monitor': password=AF76BE841B5B4692D820A49298C00272
2017-10-10 15:35:03   notice : (4) Updated monitor 'cluster-monitor': monitor_interval=1000

#: let's restart the monitor to take changes in effect
[root@maxscale maxscale_configs]# maxadmin restart monitor cluster-monitor
2017-10-10 18:40:50   error  : [mysqlmon] No Master can be determined

#: let's list existing monitors
[root@maxscale maxscale_configs]# maxadmin list monitors
---------------------+---------------------
Monitor              | Status
---------------------+---------------------
cluster-monitor      | Running
---------------------+---------------------

#: let’s create the listener, adding the client certificates for the connections
[root@maxscale maxscale.cnf.d]# maxadmin create listener rwsplit-service rwsplit-listener 0.0.0.0 4006 default default default /etc/my.cnf.d/certs/client-key.pem /etc/my.cnf.d/certs/client-cert.pem /etc/my.cnf.d/certs/ca-cert.pem
Listener 'rwsplit-listener' created
 
#: this is what log events tells us
2017-11-22 23:26:18 notice : (5) Using encrypted passwords. Encryption key: '/var/lib/maxscale/.secrets'.
2017-11-22 23:26:18 notice : (5) [MySQLAuth] [rwsplit-service] No users were loaded but 'inject_service_user' is enabled. Enabling service credentials for authentication until database users have been successfully loaded.
2017-11-22 23:26:18 notice : (5) Listening for connections at [0.0.0.0]:4006 with protocol MySQL
2017-11-22 23:26:18 notice : (5) Created TLS encrypted listener 'rwsplit-listener' at 0.0.0.0:4006 for service 'rwsplit-service'

#: listing the existing listeners 
[root@maxscale maxscale.cnf.d]# maxadmin list listeners
Listeners.

-----------------+---------------------+--------------------+-----------------+-------+--------
Name             | Service Name        | Protocol Module    | Address         | Port  | State
-----------------+---------------------+--------------------+-----------------+-------+--------
rwsplit-listener | rwsplit-service     | MySQLClient        | 0.0.0.0         | 4006  | Running
CLI Listener     | CLI                 | maxscale           | default         | 0     | Running
-----------------+---------------------+--------------------+-----------------+-------+--------

Here is the point in which you need to create the servers and then, you need alter the server’s configurations to add the SSL certificates, let’s see:

#: creating the server prod_mariadb01 and alter its configurations to add SSL
[root@maxscale ~]# maxadmin create server prod_mariadb01 192.168.50.11 3306
Created server 'prod_mariadb01'

[root@maxscale ~]# maxadmin alter server prod_mariadb01 ssl=required ssl_key=/etc/my.cnf.d/certs/client-key.pem ssl_cert=/etc/my.cnf.d/certs/client-cert.pem ssl_ca_cert=/etc/my.cnf.d/certs/ca-cert.pem

#: creating the server prod_mariadb02 and alter its configurations to add SSL
[root@maxscale ~]# maxadmin create server prod_mariadb02 192.168.50.12 3306
Created server 'prod_mariadb02'

[root@maxscale ~]# maxadmin alter server prod_mariadb02 ssl=required ssl_key=/etc/my.cnf.d/certs/client-key.pem ssl_cert=/etc/my.cnf.d/certs/client-cert.pem ssl_ca_cert=/etc/my.cnf.d/certs/ca-cert.pem
 
#: creating the server prod_mariadb03 and alter its configurations to add SSL
[root@maxscale ~]# maxadmin create server prod_mariadb03 192.168.50.13 3306
Created server 'prod_mariadb03'

[root@maxscale ~]# maxadmin alter server prod_mariadb03 ssl=required ssl_key=/etc/my.cnf.d/certs/client-key.pem ssl_cert=/etc/my.cnf.d/certs/client-cert.pem ssl_ca_cert=/etc/my.cnf.d/certs/ca-cert.pem

#: maxscale logs should be like
2017-12-02 18:56:28   notice : (19) Loaded module MySQLBackend: V2.0.0 from /usr/lib64/maxscale/libMySQLBackend.so
2017-12-02 18:56:28   notice : (19) Loaded module MySQLBackendAuth: V1.0.0 from /usr/lib64/maxscale/libMySQLBackendAuth.so
2017-12-02 18:56:28   notice : (19) Created server 'prod_mariadb01' at 192.168.50.11:3306
2017-12-02 18:57:57   notice : (20) Enabled SSL for server 'prod_mariadb01'
2017-12-02 19:00:42   notice : (22) Created server 'prod_mariadb02' at 192.168.50.12:3306
2017-12-02 19:00:49   notice : (23) Enabled SSL for server 'prod_mariadb02'
2017-12-02 19:00:58   notice : (24) Created server 'prod_mariadb03' at 192.168.50.13:3306
2017-12-02 19:01:04   notice : (25) Enabled SSL for server 'prod_mariadb03'

It’s good to say that MySQLBackend and MySQLBackedAuth are default values for the server’s protocol and the authenticator module respectively and those values are assumed by default when it’s omitted when creating servers. At this point we can show servers to see the servers configured with the SSL certificates:

[root@maxscale ~]# maxadmin show servers | grep -i ssl
    SSL initialized:                     yes
    SSL method type:                     MAX
    SSL certificate verification depth:  9
    SSL certificate:                     /etc/my.cnf.d/certs/client-cert.pem
    SSL key:                             /etc/my.cnf.d/certs/client-key.pem
    SSL CA certificate:                  /etc/my.cnf.d/certs/ca-cert.pem

And then, we can list servers, and you will see that, it’s not yet recognized by Maxscale being neither master or slave:

[root@maxscale maxscale_configs]# maxadmin list servers
Servers.
-------------------+-----------------+-------+-------------+--------------------
Server             | Address         | Port  | Connections | Status
-------------------+-----------------+-------+-------------+--------------------
prod_mysql03       | 192.168.50.13   |  3306 |           0 | Running
prod_mysql02       | 192.168.50.12   |  3306 |           0 | Running
prod_mysql01       | 192.168.50.11   |  3306 |           0 | Running
-------------------+-----------------+-------+-------------+--------------------

Next step is to add the created servers to the monitor and service; both created previously as well:

[root@maxscale maxscale_configs]# maxadmin add server prod_mariadb01 cluster-monitor rwsplit-service
Added server 'prod_mysql01' to 'cluster-monitor'
Added server 'prod_mysql01' to 'rwsplit-service’

[root@maxscale maxscale_configs]# maxadmin add server prod_mariadb02 cluster-monitor rwsplit-service
Added server 'prod_mysql02' to 'cluster-monitor'
Added server 'prod_mysql02' to 'rwsplit-service'

[root@maxscale maxscale_configs]# maxadmin add server prod_mariadb03 cluster-monitor rwsplit-service
Added server 'prod_mysql03' to 'cluster-monitor'
Added server 'prod_mysql03' to 'rwsplit-service’

#: logs
2017-10-10 18:45:45   notice : (16) Added server 'prod_mysql01' to monitor 'cluster-monitor'
2017-10-10 18:45:45   notice : (16) Added server 'prod_mysql01' to service 'rwsplit-service'
2017-10-10 18:45:45   notice : Server changed state: prod_mysql01[192.168.50.11:3306]: new_master. [Running] -> [Master, Running]
2017-10-10 18:45:45   notice : [mysqlmon] A Master Server is now available: 192.168.50.11:3306
2017-10-10 18:45:52   notice : (17) Added server 'prod_mysql02' to monitor 'cluster-monitor'
2017-10-10 18:45:52   notice : (17) Added server 'prod_mysql02' to service 'rwsplit-service'
2017-10-10 18:45:53   notice : Server changed state: prod_mysql01[192.168.50.11:3306]: lost_master. [Master, Running] -> [Running]
2017-10-10 18:45:53   error  : [mysqlmon] No Master can be determined
2017-10-10 18:45:56   notice : (18) Added server 'prod_mysql03' to monitor 'cluster-monitor'
2017-10-10 18:45:56   notice : (18) Added server 'prod_mysql03' to service 'rwsplit-service'
2017-10-10 18:45:56   notice : Server changed state: prod_mysql01[192.168.50.11:3306]: new_master. [Running] -> [Master, Running]
2017-10-10 18:45:56   notice : Server changed state: prod_mysql03[192.168.50.13:3306]: new_slave. [Running] -> [Slave, Running]
2017-10-10 18:45:56   notice : [mysqlmon] A Master Server is now available: 192.168.50.11:3306

You can see that, when adding servers to the service, which is the ReadWriteSplit, the current servers’ states and their roles pops up.

[root@maxscale ~]# maxadmin list servers
Servers.
-------------------+-----------------+-------+-------------+--------------------
Server             | Address         | Port  | Connections | Status
-------------------+-----------------+-------+-------------+--------------------
prod_mariadb01     | 192.168.50.11   |  3306 |           0 | Master, Running
prod_mariadb02     | 192.168.50.12   |  3306 |           0 | Slave, Running
prod_mariadb03     | 192.168.50.13   |  3306 |           0 | Slave, Running
-------------------+-----------------+-------+-------------+--------------------

Yet, all the configurations are modular and you can find all files created based on the dynamic configurations we have done until now at /var/lib/maxscale/maxscale.cnf.d:

[root@maxscale maxscale.cnf.d]# ls -lh
total 24K
-rw-r--r-- 1 root root 251 Dec  2 19:10 cluster-monitor.cnf
-rw-r--r-- 1 root root 299 Dec  2 18:57 prod_mariadb01.cnf
-rw-r--r-- 1 root root 299 Dec  2 19:00 prod_mariadb02.cnf
-rw-r--r-- 1 root root 299 Dec  2 19:01 prod_mariadb03.cnf
-rw-r--r-- 1 root root 313 Nov 22 23:26 rwsplit-listener.cnf
-rw-r--r-- 1 root root  71 Dec  2 19:10 rwsplit-service.cnf

SSL configurations will be on rwsplit-listener.cnf and on servers’ files:

[root@maxscale maxscale.cnf.d]# cat rwsplit-listener.cnf
[rwsplit-listener]
type=listener
protocol=MySQLClient
service=rwsplit-service
address=0.0.0.0
port=4006
authenticator=MySQLAuth
ssl=required
ssl_cert=/etc/my.cnf.d/certs/client-cert.pem
ssl_key=/etc/my.cnf.d/certs/client-key.pem
ssl_ca_cert=/etc/my.cnf.d/certs/ca-cert.pem
ssl_cert_verify_depth=9
ssl_version=MAX
 
[root@maxscale maxscale.cnf.d]# cat prod_mariadb0*
[prod_mariadb01]
type=server
protocol=MySQLBackend
address=192.168.50.11
port=3306
authenticator=MySQLBackendAuth
ssl=required
ssl_cert=/etc/my.cnf.d/certs/client-cert.pem
ssl_key=/etc/my.cnf.d/certs/client-key.pem
ssl_ca_cert=/etc/my.cnf.d/certs/ca-cert.pem
ssl_cert_verify_depth=9
ssl_version=MAX
 
[prod_mariadb02]
type=server
protocol=MySQLBackend
address=192.168.50.12
port=3306
authenticator=MySQLBackendAuth
ssl=required
ssl_cert=/etc/my.cnf.d/certs/client-cert.pem
ssl_key=/etc/my.cnf.d/certs/client-key.pem
ssl_ca_cert=/etc/my.cnf.d/certs/ca-cert.pem
ssl_cert_verify_depth=9
ssl_version=MAX
 
[prod_mariadb03]
type=server
protocol=MySQLBackend
address=192.168.50.13
port=3306
authenticator=MySQLBackendAuth
ssl=required
ssl_cert=/etc/my.cnf.d/certs/client-cert.pem
ssl_key=/etc/my.cnf.d/certs/client-key.pem
ssl_ca_cert=/etc/my.cnf.d/certs/ca-cert.pem
ssl_cert_verify_depth=9
ssl_version=MAX

At this point, as everything is set up, you can test the access to your databases through Maxscale, using the appuser_ssl (If you haven’t created that user yet, create it now on the master and check authentication). You will notice the below event added to the Maxscale’s log as of when you create new users as Maxscale will update its internal information about users on backends:

2017-12-03 00:15:17   notice : [MySQLAuth] [rwsplit-service] Loaded 15 MySQL users for listener rwsplit-listener.

If you have the user created, as we did create it before, place the below contents at the home directory of your user and test the access with the appuser_ssl user.

#: check if mysql client is present on Maxscale server
[root@maxscale ~]# which mysql
/bin/mysql

#: add the .my.cnf at your user's home directory
[root@maxscale ~]# cat .my.cnf
[client]
ssl
ssl-ca=/etc/my.cnf.d/certs/ca-cert.pem
ssl-cert=/etc/my.cnf.d/certs/client-cert.pem
ssl-key=/etc/my.cnf.d/certs/client-key.pem
[mysql]
ssl
ssl-ca=/etc/my.cnf.d/certs/ca-cert.pem
ssl-cert=/etc/my.cnf.d/certs/client-cert.pem
ssl-key=/etc/my.cnf.d/certs/client-key.pem

To execute the below test you will need to install MariaDB-client package on the MariaDB Maxscale server host.

[root@maxscale ~]# mysql -u appuser_ssl -p123456 -h 192.168.50.100 -P 4006 -e "select @@server_id\G"
*************************** 1. row ***************************
@@server_id: 2

[root@maxscale ~]# mysql -u appuser_ssl -p123456 -h 192.168.50.100 -P 4006 -e "select @@server_id\G"
*************************** 1. row ***************************
@@server_id: 3

Conclusion

It’s a very dense reading, full of practices, bells and, whittles, but, it’s going to serve as a reference for you when implementing MariaDB Maxscale thinking of having it safe, with traffic going over SSL. This is not only about Maxscale, but, about having MariaDB Servers with data being replicated using SSL certificates as well.

Remember that, as Maxscale Dynamic Commands made it possible to configure ReadWriteSplit with mysqlmon, it gives you the same as well to work with galeramon. The product is becoming more and more versatile and the main point to hilight, it’s making the task to position a load balancer or an intelligent database proxy between backends and the clients an easy thing.

AddThis Social Bookmark Button